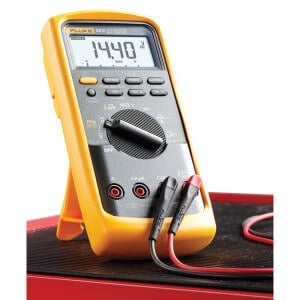
Fluke 88V deluxe automotive multimeter is used for measuring voltage, frequency, resistance and capacitances etc. In addition, 88V multimeter can perform diode test and pulse width measurements. From this article, we will make it be easier for those people who want to know steps for measuring different electrical quantities so that they can easily compare the techniques and conditions used for measurement. For its brief description, you may follow our previous article Features of Fluke 88v Automotive Multimeter.
How to measure Ac & Dc voltage with Fluke 88V deluxe automotive multimeter?
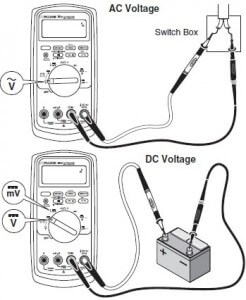
Steps for measuring Ac & Dc voltage are:
- Firstly check voltage is known or not, if the voltage is not known than set its range to the highest voltage setting and after that point the dial to ṽ for ac voltage & mV for dc voltage.
- Set the meter range in between these ranges i.e. 600.0 mV, 6.000V, 60.00V, 600.0V & 1000V.
- To select the 600.0 mV dc range, turn the rotary switch to mV.
- Inside the com jack insert black lead.
- Inside the
 jack insert Red lead.
 - Connect firstly the black lead to the circuit and after that the Red lead.
- For better accuracy when measuring the dc offset of an ac voltage, measure the ac voltage first.
- Note the ac voltage range, then manually select a dc voltage range equal to or higher than the ac range. This procedure improves the accuracy of the dc measurement by ensuring that the input protection circuits are not activated.
- If you want to measure the lowest and highest value then press Min/Max button.
- For selecting particular range press the RANGE button.
- If you want to measure the specific reference value then press relative (REL) button for measuring above or below reference values.
- Note the measurement display on the screen. When you have noted the readings, first remove the red lead from the circuit and then remove the black lead to avoid any electrical shock or damage to the device.
How to measure capacitance with Fluke 88V deluxe automotive multimeter?
It measures capacitance by charging a capacitor with a known current, measuring the resulting voltage and then calculating the capacitance.
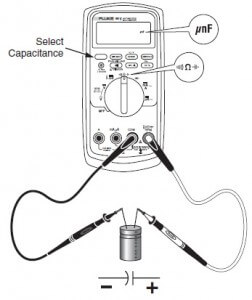
Steps for measuring capacitance are:
- Firstly ensures that all the power to the circuit is cut off. If the capacitor is connected in ac circuit then set the multimeter to ac voltage or vice versa.
- Point the rotary switch to the capacitance function.
- Press
 this button for measuring capacitance.
 - Set the meter capacitance ranges i.e. 10.00 nF, 100.0 nF, 1.000 µF, 10.00 µF, 100.0 µF and 9999 µF.
- Inside the com jack insert black lead.
- Inside the
 jack insert Red lead.
 - Connect firstly the black lead to the circuit and after that the Red lead.
- Connect the test lead to the capacitor terminals.
- To improve the accuracy of measurements less than 1000 nF, use the relative (REL) mode to subtract the residual capacitance of the Meter and leads.
- Note down the measurement displayed on the screen. If the capacitor value lies within the specified range then the multimeter displays the result otherwise capacitor is faulty.
Note: If too much electrical charge is present on the capacitor being tested, the display shows “diSC”.
How to measure Ac & Dc current with Fluke 88V deluxe automotive multimeter?
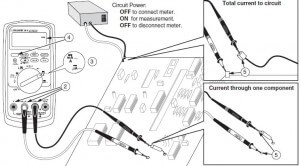
Steps for measuring Ac & Dc current are:
- Turn off power to the circuit. Discharge all high voltage capacitors.
- Inside the com jack insert black lead.
- For current between 6 mA & 400 mA, insert the red lead into the mA/µA terminal. For current above 400 mA, insert the red lead into the A terminal.
- Connect firstly the black lead to the circuit and after that the Red lead.
- If you are using the A terminal, set the rotary switch to mA/A. If you are using the mA/ µA terminal set the rotary switch to µA for current below 6000 µA or mA/A for current above 6000 µA.
- For Dc current measurement press A.
- Break the circuit path to be tested. Touch the black probe to the more negative side of the break and touch the red lead to the more positive side of the break.
- Turn on the power to the circuit then read the display.
- Turn off the power to the circuit and discharge all high voltage capacitors.
- Note down the measurement displayed on the screen. If the capacitor value lies within the specified range then the multimeter displays the result otherwise capacitor is faulty.
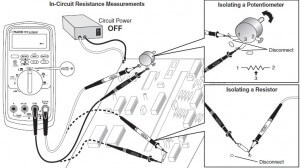
How to measure resistance with Fluke 88V deluxe automotive multimeter?
Steps for measuring resistance are:
- Select the resistance ranges i.e. 600.0 Ω, 60.00kΩ, 6.000kΩ, 600.0kΩ & 6.000 MΩ and 50.00M Ω.
- Set Resistance value as per your requirement.
- Turn the rotary switch to Ω.
- Inside the com jack insert black lead.
- Inside the
 jack insert Red lead.
 - Connect firstly the black lead to the circuit and after that the Red lead.
- For measurement, the meter sends small current through the circuit.
- The resistance measured is the total resistance of all paths because the current flows through all possible paths between the probes.
- Note the measurement display on the screen. When you have noted the readings, first remove the red lead from the circuit and then remove the black lead to avoid any electrical shock or damage to the device.
How to test continuity with Fluke 88V deluxe automotive multimeter?
Steps for testing continuity are:
- Point the rotary switch to

- Inside the com jack insert black lead.
- Inside the
 jack insert Red lead.
 - Connect firstly the black lead to the circuit and after that the Red lead.
- Set one range available i.e. 600.0 Ω.
- Maximum resolution is of 1Ω.
- When meter measures the resistance less than 20 Ω, the meter will sound the beeper.
- Use an audible signal to indicate the shorts.
The continuity function detects intermittent opens and shorts lasting as little as 1ms. It is useful for checking the integrity of switches or contactors for closure, connections or circuit paths.
For Fluke 88v Automotive Testing applications click here: Testing applications
Hope you like this article.


One Comment