

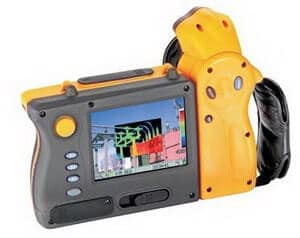
Fluke Ti55ft infrared camera is an award winning IR-Flex portable infrared camera. Its unique control image & IR-Fusion technology enables you to combine visible light images and infrared images to create an efficient single image with enhanced details. It is available in seven models i.e. TiR2, Ti40 and Ti45 camera use a detector with 160 x 120 resolution and TiR3, TiR4 and Ti55 camera use a detector with 320 x 240 resolution.
IR- Fusion blend levels of Fluke Ti55ft infrared camera:
Following steps for setting IR- Fusion blend level are:
- Press and hold
 this button until the IR-Fusion blend level dialog box appears on the screen
 - While continuing to pressthis button, use the mouse controller to slide the IR- Fusion blend level bar in the dialog box.
- To retain settings, tap the trigger button i.e.


Want to know different types of display modes of fluke Ti55ft infrared camera? Click here: Display modes
Image Capturing with Fluke Ti55ft infrared camera
Steps for Capturing an image with Fluke Ti55ft infrared camera are:
- Firstly pause the live image by pressing this button.
- Review your camera settings and the image.
- To capture or save image press & holdthis button for 2 seconds.
- The image file name appears in the upper left-hand corner of the display screen indicating the image is saved on the memory card.
- Again pressthis button to return to the target mode.

Programming functions of Fluke Ti55ft infrared camera:
Ti55ft supports many functions which can be operated by the buttons available on the multimeter body. Every specific button is shown and described below with full functionality in the form of table.
|
Symbol
|
Description
|
 |
Zoom – It is used to quickly cycle between 2x, 4x, 8x zoom, and normal display settings
|
 |
Annotation – It is used to quickly access the image annotation editor (available on TiR2, TiR4,Ti45 and Ti55 models only).
|
 |
Centerpoint/Centerbox –It is used to select the condition of centerpoint/centerbox either on/off or both on/off.
|
 |
Brightness – It is used to quickly cycle through the display screen brightness settings.
|
 |
Browse Thumbnails – It is used to quickly browse thumbnails of images stored on the Compact Flash memory card.
|
 |
Palette Visible – It is used to quickly cycle the color palette bar on or off the display screen
|
 |
Browse Images – It is Used to immediately recall the last saved or last viewed image
|
 |
Torch – It is used to quickly switch the LED light on or off. When on light shines continuously to brighten up dark work areas else light automatically times out after 60 seconds
|
 |
Marker Toolbar Visible – It is used to show or hide the marker toolbar for adding extra visible marker points or areas to the image and displaying temperatures near them.
|
 |
Start Sequence – It is used to quickly start the Auto Capture sequence.
|
 |
Image Enhancement – It is used to quickly cycle through the image enhancement settings i.e. “Off,” “Normal,” “Medium,” and “High.”
|
 |
Laser – It is used to help you correlate what is on the camera display screen with what you are looking at.
|
 |
Stop Sequence – It is used to quickly stop the Auto Capture image capture sequence
|
 |
Recalibrate – It is used to manually trigger an internal calibration adjustment
|
 |
Picture-in-Picture – It is used to quickly switch between full-screen view and picture-in-picture view.
|
Operating modes of Fluke Ti55ft infrared camera:
Fluke Ti55ft infrared camera has three operating modes. We are going to explain you these operating modes one by one.
(i) Scan/Target Mode:
This mode is used to target or scan our object. To scan target area of interest, you have to follow these steps:
- Switch on the camera by pressing
 this button.
 - Now remove lens cap for pointing the target area.
- Properly focus the target area shown on the display screen.
- Set the camera’s temperature level and span by pressingthis button.
- To quickly bring the target area into view, pressthis button again as needed.
- To view various screens move the camera or lens module as necessary.
(ii) Pause/Save mode:
This mode is used to save the current image and to pause the previous image. Following steps are:
- To pause & then save a target area image, follow the Scan target procedure and quickly press thisTrigger button.
- When the word paused appears in the left corner of the display then you can easily analyze your image & determine whether it is acceptable enough to save or not.
- If not, then quickly press this button to return to scan target mode.
- If an image is right then ensures Compact flash memory card is inserted or not. If it is inserted then save & store your images for future preference.
(iii) View/Delete images:
(a) View images:
To view images you have to follow these steps:
- When the memory card is inserted then press

- To position the pointer over Browse images on the popup menu use the mouse controller and press

- Position the pointer over the thumbnail view of the image and double- clickthis button to open.
- To close the open image and return to scan target mode press this button.
- To accept the setting change and return to scan target mode press this button.
(b) Delete images:
To delete images saved on your memory card you have to follow these steps:
- When the memory card is inserted then press
- To position the pointer over Browse images on the popup menu use the mouse controller and press
- Position the pointer over the thumbnail view of the image you want to delete and press this button.
- Pressto position the pointer over the Delete button.
- A new dialog box appears; select YES to delete the image, NO to keep the image, or CANCEL to cancel the operation.
- To close the Thumbnail screen and return to scan target mode press this button.
Hope you all like this article.