87V Fluke Multimeter Measurements
87V Fluke multimeter is used for measuring Ac & Dc voltage, Ac & Dc current, frequency and capacitances, Resistances, etc. From this article, it became easier for those people who want to know steps for measuring different electrical quantities so that they can easily compare the techniques and conditions used for measurements. If you want to know some basic information on this multimeter you may follow our previous guide on 87V Fluke multimeter.
How to measure AC & DC voltage with 87V Fluke Multimeter?
Steps for measuring AC & DC voltage are:
- Firstly check voltage is known or not, if the voltage is not known than set its range to the highest voltage setting and after that point the dial to ṽ for ac voltage & mV for dc voltage.
- Set the meter range in between these ranges i.e. 600.0 mV, 6.000V, 60.00V, 600.0V & 1000V.
- Inside the com jack insert black lead.
- Inside the VΩ jack insert Red lead.
- Connect firstly the black lead to the circuit and after that the Red lead.
- If you want to measure the lowest and highest value then press Min/Max button.
- For selecting particular range press the RANGE button.
- If you want to write down the stable measurement then press the HOLD button.
- If you want to measure the specific reference value then press relative (REL) button for measuring above or below reference values.
- Note the measurement display on the screen. When you have noted the readings, first remove the red lead from the circuit and then remove the black lead to avoid any electrical shock or damage to the device.
How to measure Frequency with 87V Fluke multimeter?
Steps for measuring Frequency are:
(i) If frequencies setting available on the dial the steps for measuring frequency are:
- Point the dial to Hz.
- Inside the com jack insert black lead.
- Inside the VΩ jack insert Red lead.
- Connect firstly the black lead to the circuit and after that the Red lead.
- Note the measurement display on the screen. When you have noted the readings, first remove the red lead from the circuit and then remove the black lead to avoid any electrical shock or damage to the device.
- The abbreviation Hz appears to the right of the reading.
(ii) If frequency button is available the steps for measuring frequency are:
- Point the dial to ac voltage.
- Inside the com jack insert black lead.
- Inside the VΩ jack insert Red lead.
- Connect firstly the black lead to the circuit and after that the Red lead.
- Note down the voltage measurement in the display.
- Now press Hz button and measure the frequency displayed on the screen.
- Note the measurement display on the screen. When you have noted the readings, first remove the red lead from the circuit and then remove the black lead to avoid any electrical shock or damage to the device.
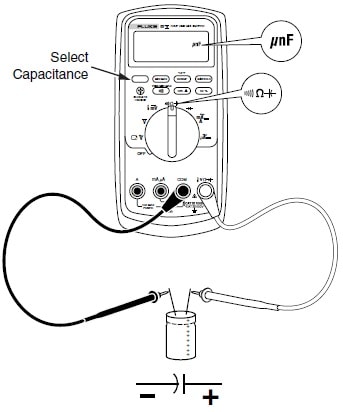
How to measure capacitance with 87V Fluke multimeter?
Steps for measuring capacitance are:
- Firstly ensures that all the power to the circuit is cut off. If the capacitor is connected in ac circuit then set the multimeter to ac voltage or vice versa.
- Point the dial to the capacitance function.
- Set the meter capacitance ranges i.e. 10.00 nF, 100.0 nF, 1.000 µF, 10.00 µF, 100.0 µF and 9999 µF.
- Inside the com jack insert black lead.
- Inside the VΩ jack insert Red lead.
- Connect firstly the black lead to the circuit and after that the Red lead.
- Connect the test lead to the capacitor terminals.
- Note down the measurement displayed on the screen. If the capacitor value lies within the specified range then the multimeter displays the result otherwise capacitor is faulty.
- For accurate measurement remove the capacitor from the circuit.
How to measure Resistance with 87V fluke multimeter?
Steps for measuring Resistances are:
- Select the resistance ranges i.e. 600.0 Ω, 60.00kΩ, 6.000kΩ, 600.0kΩ & 6.000 MΩ and 50.00M Ω.
- Set Resistance value as per your requirement.
- Turn the dial to Ω.
- Inside the com jack insert black lead.
- Inside the VΩ jack insert Red lead.
- Connect firstly the black lead to the circuit and after that the Red lead.
- For measurement, the meter sends small current through the circuit.
- The resistance measured is the total resistance of all paths because the current flows through all possible paths between the probes.
- Note the measurement display on the screen. When you have noted the readings, first remove the red lead from the circuit and then remove the black lead to avoid any electrical shock or damage to the device.
How to measure Ac & Dc Current with 87V multimeter?
Steps for measuring Ac & Dc current are:
- Point the dial to mA Hz or A Hz.
- Inside the com jack insert black lead.
- For current between 6 mA & 400 mA, insert the red lead into the mA/µA terminal. For current above 400 mA, insert the red lead into the A terminal.
- Connect firstly the black lead to the circuit and after that the Red lead.
- If you are using the A terminal, set the dial to mA/A. If you are using the mA/ µA terminal set the dial to A for current below 6000 µA or mA/A for current above 6000 µA.
- For Dc current measurement press A.
- Break the circuit path to be tested. Touch the black probe to the more negative side of the break and touch the red lead to the more positive side of the break.
- Turn on the power to the circuit.
- Note down the measurement displayed on the screen. If the capacitor value lies within the specified range then the multimeter displays the result otherwise capacitor is faulty.


