

Hey guys, here we are going to explain you how Fluke TiX520 captures images, Controls etc. Before using Fluke TiX520 infrared camera, it is always recommended to go through its features guidelines.

Image Capturing with Fluke TiX520 infrared camera
This camera possesses lens of resolution 320×240 because it captures images with its Laser sharp Auto focus system.Hence, the quality of the images captured by Fluke TiX520 infrared camera is highly impressive and clear.
Procedure for capturing images with this camera are:
- At the target object points your imager of the camera.
- You can focus your object with the LaserSharp™ Auto Focus System or advanced manual focus
- Ensures that your object is in focus.
- Now pull and release the green coloured Image Capture button of an infrared camera.
- After pulling & releasing, the camera will capture and freeze the image.
- In memory buffer your captured image is available, you can save or edit them as per your requirement.
- To save the image push F1 labelled key.
- To cancel or return to the live view push F3 labelled key.
- Depending on your selected file format settings, the imager shows the captured image and the menu bar.
- At the menu bar you can easily edit your images,save images, add voice annotations or IR-photonotes digital photos.
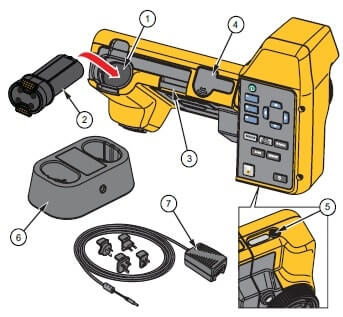
Bottom Panel of Fluke TiX520 infrared camera
| Item |
Description
|
| ① | Smart Battery Port |
| ② | Lithium-ion Smart Battery |
| ③ | Anchor for Neck Strap |
| ④ | SD Memory Card Slot |
| ⑤ | Tripod Mount |
| ⑥ | 2-Bay Battery Charging Base |
| ⑦ | AC Power Adapter with Universal Adapter |
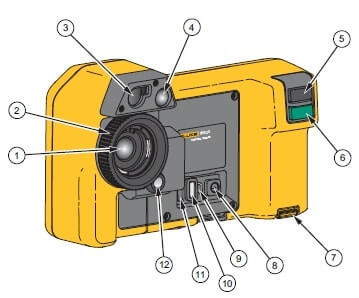
Controls of Fluke TiX520 infrared camera
|
Item
|
Description |
| ① | Infrared Camera Lens |
| ② | Focus Control |
| ③ | Laser Distance Finder |
| ④ | Visual Camera and Lens |
| ⑤ | Laser Distance Finder Button |
| ⑥ | Image Capture Button |
| ⑦ | Hand Strap Anchor |
| ⑧ | AC Adapter/Charger Input Terminal |
| ⑨ | USB-to-PC Cable Connection |
| ⑩ | USB Accessory Connection |
| ⑪ | HDMI Video Connection |
| ⑫ | LED Light |
Temperature measurement with Fluke TiX520 infrared camera
These cameras are specially designed camera capture radiating energy when we capture images.The quantity of energy radiated is based on the actual surface temperature and surface emissivity of the object.When we captures images, the imager senses the infrared energy from the surface of the object and uses this data to calculate an estimated temperature value.The surfaces which have high emissivity like water, skin, painted metal etc are a good conductor of radiating energy and produces relatively accurate measurements.If the surface has low emissivity then we adjust it as per our need.Adjustment to the emissivity setting will usually allow the Imager to calculate a more accurate estimate of the actual temperature.
Color alarms of Fluke TiX520 infrared camera
Fluke TiX520 infrared camera imager has various apparent temperature color alarms for high temperature and low temperature.
(i) High-Temperature color alarm : It shows a full visible image and only shows infrared information on objects or areas that are above the set apparent temperature alarm level.
(ii) Low-temperature color alarm: It shows a full visible image and only shows infrared information on objects or areas that are below the set apparent temperature color alarm level.
Procedure to view color alarm menu setting of high temperature level color alarm and low temperature color alarm are as follows:
View color alarm menu:
To view the color alarm menu follow these steps:
- Go to Image > Color alarm
- To view the menu again press the F1 labelled button
Set high temperature color Alarm
To Set high temperature color Alarm follow these steps:
- Go to Image > Color alarm > Set High Alarm
- To adjust the temperature settings press this buttons.
- To set new value press F1 or F2 labelled key.
Set Low temperature color Alarm
To Set high temperature color Alarm follow these steps:
- Go to Image > Color alarm > Set Low Alarm
- To adjust the temperature settings press this buttons.
- To set new value press F1 or F2 labelled key.
What is IR-Photonotes and how you add photos using these notes into Fluke TiX520 infrared camera?
The IR-PhotoNotes™ photo annotation system allows you to capture and add up to five visible (digital) images of various objects, text, or other information that is related to the analysis and reporting of an infrared image. These visible images are only available in the .is2 file format and are stored in the file.Examples of possible annotations include printed information or warning signs, larger views of the environment or room etc.
To add photos using these notes we have to follow these steps:
- With the infrared image in the buffer,press F2 labelled button to open the Edit image menu.
- To highlight IR-Photonotes press
 buttons.
 - To enter the picture mode press F1 labelled button.
- Focus the imager on the object and push the image capture button.
- When you captured the image press F2 labelled button.
- If you want to capture additional pictures again push the image capture button.
- For saving the picture with the image push F1 labelled button.
Hope this article will help you. For any suggestions please comment below. We always appreciate your suggestions.
One Comment