

In your mind, lots of questions arise like what is infrared and why we prefer infrared camera against other cameras etc. We will explain you these things one by one, hope it will help you. If you want to gather some basic information of Fluke TiS65 infrared camera like its features and capabilities, you can follow our previous tutorial Fluke TiS65 Infrared Camera.

Infrared light:
Infrared is a form of light which we cannot see with our eyes but in our daily life we feel it as a heat i.e. it is a type of electromagnetic radiation. It is a part of the EM spectrum which is invisible to human eyes. Sir William Hershel discovered the infrared light in 1800, in his experiment he proved that there must be more light beyond the red colour which we can’t see with our eyes. Basically, night vision goggles pick up the infrared light emitted by our skin.

The electromagnetic spectrum shown above indicates that light does not stop at just the infrared & visible band and it may travel through microwave & radio waves with the speed of light. In three ways, we can transfer heat from one place to another i.e. through conduction, convection & IR radiations. Everything with a temperature above about 5 degrees Kelvin emits IR radiation.
How do infrared cameras work?
An infrared camera is a non-contact device which converts one form of energy into another form. It detects infrared energy in the form of heat and converts it into electrical signals, which after conversion produces a thermal image on a video monitor and perform temperature calculations. You not only can monitor thermal performance but also evaluate and identify the relative severity of heat-related problems.

Uses of Fluke TiS65 Infrared camera
The given picture says itself you need not say anything, it is based on IR fusion technology that makes you visualise & diagnose problems & location instantly. Fluke TiS65 infrared camera analyse images, solve them with precise non-contact temperature measurement and document them with professional F1 reports automatically within seconds. Following are the reasons we are using Fluke TiS65 infrared camera:
(A) Precisely Blended Image:
For quick analysis of infrared images, image quality is is first and above all priority. Fluke TiS65 infrared camera blend the visible light & infrared images to capture the clear 5MP real world picture of your target. For capturing a hybrid image, this camera blends at different levels with picture-in-picture mode.
Note: A hybrid image is an image that is perceived in one of two different ways, depending on viewing distance, based on the way humans process visual input, that means image has different view for different angles. When we blend the camera, we get more clear and focused image. That’s why Fluke TiS65 infrared camera is an ideal choice.

(B) Precisely focused images:
If your image is out of focus and you try to focus it manually it would take a lot of time and careful attention. But with laser sharp auto focus you can get an in-focus image of your designated target. The built-in laser distance meter can analyse, calculate distance instantly & display the distance to your target & focus immediately.

(C)Blended Heat map:
By blending the infrared heat map in any of the five blending modes you can easily find out the breaker number of an instrument that is hot whenever you want. In the near mode, you can see aligned images as close as 15 cm or from a distance in far mode. Select the centre measurement box & fill it with your target for the exact area of temperature measurement. Also, you can obtain accurate readings without taking your eyes off the screen.

(D)The Combination of camera and software works incredibly interesting:
Without accurate measurement, an infrared images will not exactly examine the condition of an electrical connection or worn mechanical part. So for accurate measurement it is essential to use any software that’s why Fluke TiS65 infrared camera came into existence and uses Smartview software. You can analyse images, convert image file in multiple formats & create a professional report i.e. F1 reports with this smartview software. From Fluke site, you can easily download this software at free of cost.
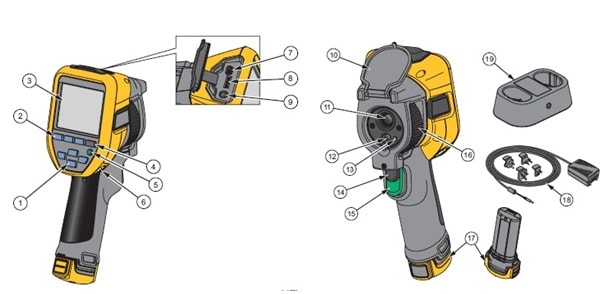
Buttons and functions of the Fluke Tis65 infrared camera
|
Sr no.
|
Description
|
|
①
|
Use these arrow buttons for Right, Left, Up and down function
|
|
②
|
It indicates three function buttons i.e. F1,F2, F3
|
|
③
|
Screen Display
|
|
④
|
Memory view button
|
|
⑤
|
It is power On/off Calibration on demand button
|
|
⑥
|
For hand strap Anchor press this button
|
|
⑦
|
For USB cable connection use this button
|
|
⑧
|
Use this slot for removable Micro SD Memory card
|
|
⑨
|
For external power or Ac adapter use this socket
|
|
⑩
|
Retractable lens cover
|
|
⑪
|
It shows infrared camera lens
|
|
⑫
|
It shows visual light camera lens
|
|
⑬
|
It is laser pointer in this camera
|
|
⑭
|
Secondary trigger
|
|
⑮
|
Primary Trigger
|
|
⑯
|
With this you can Manually control focus
|
|
⑰
|
Lithium Ion smart battery
|
|
⑱
|
AC power supply with mains adapters
|
|
⑲
|
It is 2-bay battery charge base
|
Capturing an image with Fluke TiS65 infrared camera:
Procedure for capturing an image with Fluke TiS65 infrared camera are:
- At the target object, points imager of your camera.
- Ensures that your object is in focus.
- Firstly pull and release the primary trigger of an infrared camera.
- After pulling & releasing, the camera will capture and freeze the image.
- If you want to cancel the captured image, pull the primary trigger again for 3 times to return to the Live view.
- According to your selected file format settings, imager of your camera shows the captured image and a menu bar.
- As shown on the menu bar you can easily save the image, add voice annotations or IR-PhotoNotes™, edit some image settings etc.
- You can also change the file format as per your requirement.
What are IR- Photonotes and how will you add photos using these notes?
IR- Photonotes is a photo annotation system used to capture image and add up to three visible (digital) images of various objects. To add photos using these notes we have to follow these steps:
- Press F2 labelled button to open the Edit image menu.
- To highlight IR-Photonotes press buttons.
- To enter the picture mode press F1 labelled button.
- Focus the imager on the object and push the image capture button.
- When you captured the image press F2 labelled button.
- If you want to capture additional pictures again push the image capture button.
- For saving the picture with the image push F1 labelled button.
Hope this article will help you. For any suggestions please comment below. We always appreciate your suggestions.