Digital multimeter is the best electronic tool preferred by professional technicians for measuring lots of electrical parameters like voltage, current, capacitance, resistance, continuity, and temperature. You can use it anywhere anytime because of its compact design and durability.
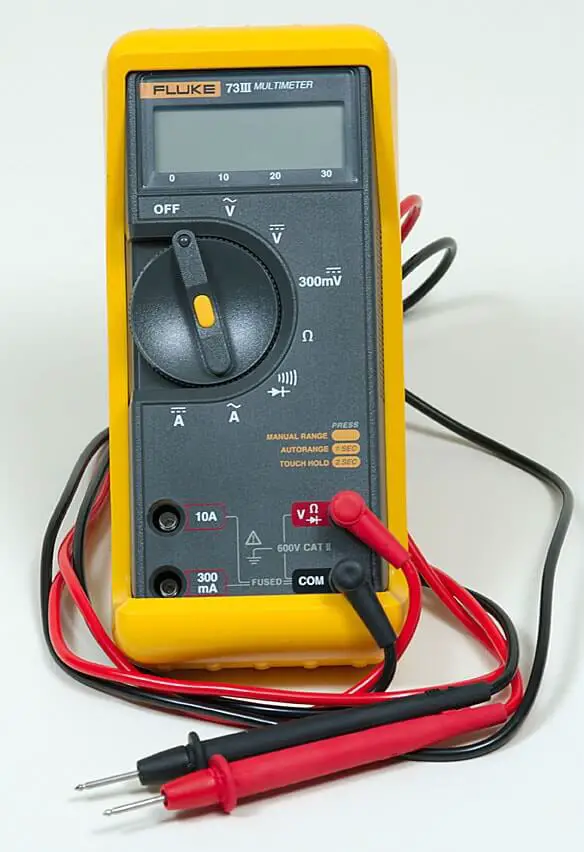
If you don’t know how to use a multimeter then you are at the right place, here we are going to explain to you how to use it for measurement of electrical parameters step by step. Before using multimeter go through our detailed article on working principle of digital multimeter for accurate results.
Measure Ac & Dc Voltage using a Digital Multimeter
As all we know, an Ac voltage generally flows in our houses and has a frequency of 50Hz while Dc voltages flow in automobiles and household batteries and have a frequency of 0 Hz.
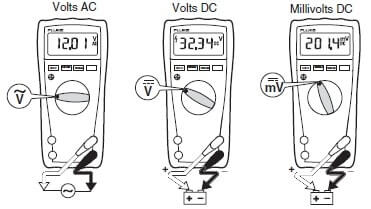
Steps to measure a voltage with a multimeter:
For the measurement of voltage steps are described below:
- Inside the COM jack insert the black lead.
- Inside the VΩ jack insert the Red lead.
- Turn the dial to voltage function either ac or dc.
- Connect the black probe to the negative end of the battery.
- Connect the Red probe to the positive end of the battery.
- Connect firstly the black lead to the circuit and after that, the Red lead.
- Set AC or DC voltage as per your requirement.
- Press specific button gave on the multimeter to measure dc mill volts & ac mill volts.
- Note the measurement display on the LCD screen. When you have noted the readings, first remove the red lead from the circuit and then remove the black lead to avoid any electrical shock or damage to the device.
Measure Resistance using a Digital Multimeter
Resistance basically obstructs the path of flow of current. According to ohm’s law, resistance is inversely proportional to current indicates that the more resistance will results in lesser current flow through the circuit.
Steps to measure resistance with a multimeter:
- Inside the com jack insert the black lead.
- Inside the VΩ jack insert the Red lead.
- Turn the dial to Ω.
- Place the probes to the two ends of the material.
- Set resistance value as per your requirement.
- For measurement, the meter sends a small current through the circuit.
- The resistance measured is the total resistance of all paths because the current flows through all possible paths between the probes.
Note: the measurement display on the LCD screen. When you have noted the readings, first remove the red lead from the circuit and then remove the black lead to avoid any electrical shock or damage to the device.

Capacitance Measurement using a Digital Multimeter
As all we know, the capacitor is a passive device used to store electric charge and usually, it blocks Dc and passes Ac through it.
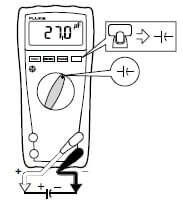
Steps to measure capacitance with a multimeter:
For capacitance measurement following steps are described below:
- Inside the COM jack insert the black lead.
- Inside the VΩ jack insert the Red lead.
- Turn the dial to the capacitor function.
- Place the probes to the two ends of the capacitor.
- Set capacitance value as per your requirement.
- Note the measurement display on the LCD screen. When you have noted the readings, first remove the red lead from the circuit and then remove the black lead to avoid any electrical shock or damage to the device.
How to Measure Electrical Current with a Multimeter
A digital multimeter consists of an ammeter to check electrical current. The value of current calculated by the ammeter is then processed by multimeter and then is shown in the screen. The current can be tested using both Analog and Digital multimeter in the circuit. And you can check AC and DC both type of current.
As written above, another use of digital multimeter is to check AC and DC current. Testing value of current with digital multimeter is similar to testing voltage. But due to many options and different multimeter brands available in the market, it gets quite confusing for user to test it accurately.
But don’t worry, we have listed the complete process step by step for you. But before we recommend you to read our detailed guide how multimeter works.
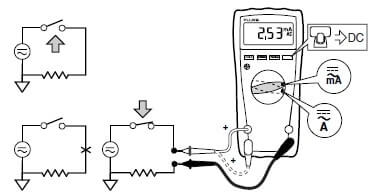
Steps to test current with a Multimeter:
To check electrical current with a multimeter, the first step is to confirm that the reading on the screen is zero. Then insert black lead and red lead in COM jack and mA jack respectively. Third step is to Turn the dial to the current function and connect black and red probe to the negative and positive end of the battery. Set AC or DC current as per your requirement.
Step by step process to use multimeter to measure current is described below:
- Insert the black lead inside the COM jack.
- Insert the Red lead inside the mA jack.
- Turn the dial to the current function.
- Connect the black probe to the negative end of the battery.
- Connect the Red probe to the positive end of the battery.
- Set AC or DC current as per your requirement.
- Connect the Black lead to the circuit first and after that, the Red lead.
- Press the specific button given on the multimeter to measure dc mill ampere & ac mill ampere.
- Note the measurement display on the screen.
Note: When you have noted the readings, first remove the red lead from the circuit and then remove the black lead to avoid any electrical shock or damage to the device. And Don’t leave multimeter in ammeter position after checking the current.
Note: In some multimeters fourth jack is also available used for measuring high current above 10A. Procedure for that is also same as explained above, you just have to do little bit adjustments.
Test Continuity using a Digital Multimeter
Continuity is the physical property that indicates the ability of the material to conduct current through it. We perform a continuity test to verify and check the soldering points and to debug the circuit for broken lines etc.
Steps for testing continuity with a multimeter:
For performing the continuity test following steps are described below:
- Inside the COM jack, insert the black lead.
- Inside the mA jack, insert the Red lead.
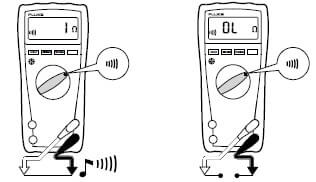
- Turn the dial to the continuity function.
- Place the probes at the two ends of the material that you want to check the continuity.
- Connect firstly the black lead to the circuit and after that, the Red lead.
- Now if you hear the beep sound then the circuit connection is a closed-circuit i.e. it is a conductor otherwise it is an open circuit.
Measure Temperature using a Digital Multimeter
Some advanced multimeters, like Fluke multimeters, have in-built temperature measuring capability. They measure temperature with the help of thermocouples connected.
Steps for measuring temperature with a multimeter:
For the measurement of Temperature steps are described below:
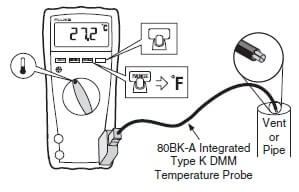
- Inside the COM jack and VΩ jack insert 80BK-A integrated type K digital multimeter temperature probe.
- Turn the dial to Temperature function.
- Note the display reading on the LCD screen which shows the temperature of the Type K thermocouple.
- Press a specific button of different colors depending on the multimeter for temperature measurement in Fahrenheit & Celsius.
Hope you all like this article. For any suggestions please comment below. We always appreciate your suggestions.
Using a multimeter is not an easy task I thought. I don’t know how to use it properly before some days ago. I don’t know how to measure AC & DC voltage.
After read out your post carefully, now I’m very much clear and able to use it accurately.
All steps mentioned here very fabulously. Well just one more thing, can you please describe a bit more about measuring temperate in different scale in your next post.
Thanks a lot man…!!!