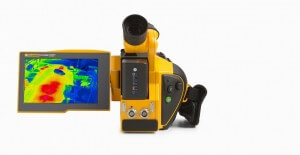
Fluke TiX1000 infrared camera is known as thermal imager used as a mobile device for storing and measuring temperature value. You can read about
key features and basic of Fluke TiX1000 infrared camera to get more overview on this device. Here we are going to explain to you functional principle, functional units, focus modes etc.

Functional principle of Fluke TiX1000 infrared camera
When we capture an image, the lens focuses the infrared light emitted by the objects. The focussed light is further scanned by a detector array of infrared detector elements which creates a detailed pattern of temperature and translate them into electrical signals. These electrical signals got further processed by electronic functions i.e. gain correction, A/D conversion and pixel correction etc.which are necessary for camera operation. You can perform camera operations directly either by using integrated keyboard such as joystick, switch, function etc or by using optional interfaces like RS232, Ethernet etc.
Parts of Fluke TiX1000 infrared camera
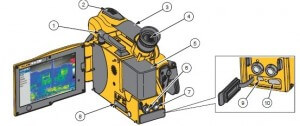
Following parts of Fluke TiX1000 infrared camera are given in the table below. Have a look over it.
|
Item
|
Description
|
| ① |
WLAN/Bluetooth |
| ② |
Connection for GigE-Vision, RS232
|
| ③ |
Multifunction button |
| ④ |
Connection for power supply, trigger, FBAS
|
| ⑤ |
Handle |
| ⑥ |
SD card slot
|
| ⑦ |
Color TFT viewfinder |
| ⑧ |
USB port
|
| ⑨ |
Lithium-ion battery |
| ⑩ |
DVI port |
Functional Units of Fluke TiX1000 infrared camera
(i) Camera lens:
In the field of view when we capture an image, lens basically collects the infrared light radiations emitted by the object and obtains infrared radiation on the detector array.It also determines the field of view and resolution/measuring spot size at the same distance to the focal distance.
(ii) Detector:
This camera comprised of uncooled microbolometer FPA detector with a resolution of (1024 x 768) or (640 x 480) IR pixels.These detector elements absorb those radiations which are reproduced onto it from the field of view by the lens. The detector elements create a different temperature pattern & translate them into electrical signals and further these signals can be analyzed electronically, read-out line-by-line and column-by-column using a read-out circuit.
(iii) Detector Electronics:
To ensure that the analog output signal of the detector is preprocessed and digitalized, we using detector electronics because it supply the bias voltages and actuation signals for detector operation.
(iv) Image Processing Electronics:
In our camera, we implement real-time image processing with the help of FPGA (Field Programmable Gate Array) and up to two processors and functions.Following essential functions are:
- GigE-Vision interface
- Low-pass filtration
- Detector electronics interface
- PC interfaces (Wi-Fi SD Card/USB2.0)
- Gain and offset correction
- Zoom generator
- VIS/IR/graphics mixer
- Defect pixel treatment
- Video image interfaces (DVI-D, FBAS)Graphics overlay
(v) Optomechanics:
In our camera, with the help of automechanic assembly the following functions are implemented:
- Internal NUC (Non-Uniformity Correction) with shutter
- LaserSharp® Auto Focus
- Measuring range switch-over (apertures)
(vi) Power supply:
To supply power to the thermal imager, we use an external 15V ac adapter or a rechargeable lithium- ion battery 7.2V.On the backside of the camera insert rechargeable battery vertically into the designated position and on the backside of the housing connect ac adapter to the 14-pin LEMO socket.
Focus with Fluke TiX1000 infrared camera
It is important to carefully set the focus of the camera to achieve a precise temperature measurement.
Either
manually or automatically we focus the images using the focus rocker switch

.If you want to focus image manually, then press left side of the focus rocker switch in order to change the focus to longer distances and/or press the right side of the focus rocker switch in order to change the focus to shorter distances. In case of Auto focus press the

center function of the focus rocker switch.
You can focus images by using any of these three focus types:
(i) LaserSharp® Auto Focus
For setting this focus follow these steps:
- Go to Laser menu and select LaserSharp Auto Focus.
- Push the center function of the focus rocker switch.
(ii) Permanent LaserSharp® Auto Focus
For setting this focus follow these steps:
- Go to the Laser menu and select LaserSharp Auto Focus.
- The laser will continuously display and will automatically focus when the distance to target changes.
(iii) EverSharp Multifocal Recording
For setting this focus follow these steps:
- Go to the “Extras submenu” in the “Settings Menu”.
- Select “EverSharp” within this menu
Once selected, the camera takes all images in the EverSharp mode.
Note : Images taken with EverSharp will be viewable in SmartView® software.
Modes of Fluke TiX1000 infrared camera
Fluke TiX1000 infrared camera display infrared images, Display images or the combination of both with the IR fusion technology.You can view the image in any of the modes as per your choice by selecting the mode from the dropped down menu.If an infrared image is currently displayed, you can switch to Digital image or IR Fusion® , from the Digital image mode you can switch to infrared image or IR Fusion® and from the IR Fusion® mode you can switch to infrared image or Digital image.Have a look over its two modes:
(a) Infrared mode:
In this mode, the thermal image is shown in false color representation. Image displays (1024 x 768) or (640 x 480) IR pixels with the digital zoom switched off depending on the device.Due to optomechanic MicroScan functions, SuperResolution and Dynamic SuperResolution the geometric resolution can be increased to (2048 x 1536) and/or (1280 x 960) IR pixels.
(b) Digital Image mode:
In this mode, the camera-internal digital photo channel is operated in video mode and displayed with a geometric resolution of (1024 x 720) pixels. The option of saving photos with the available pixel resolution of (3264 x 2448) pixels is set in the “File” menu using the “Saving format” menu item.
Fields of Applications of Fluke TiX1000 infrared camera
Following fields where these cameras play a vital role are:
- Thermographic inspection of electrical and
- Mechanical systems
- Quality assurance
- Material inspections
- Optimization of components and assemblies
- Building inspection and diagnostics
- Control of process temperatures
- Research and development
Hope you all like this article.
 .If you want to focus image manually, then press left side of the focus rocker switch in order to change the focus to longer distances and/or press the right side of the focus rocker switch in order to change the focus to shorter distances. In case of Auto focus press the
 center function of the focus rocker switch.
